The morning sunlight streams through my kitchen window as I flip another perfectly golden pancake onto the growing stack. I can’t help but reminisce about my grandmother’s Sunday breakfasts—the warm, buttery aroma filling the house, drawing sleepy family members to the table. Martha Stewart’s pancake recipe captures this exact essence of American breakfast tradition, but with her signature touch of refined perfection. It’s no coincidence that her method has become a gold standard for home cooks seeking that elusive combination of fluffiness and flavor.
Martha Stewart, the domestic empress herself, didnt just create another pancake recipe—she perfected the science and art of the ideal breakfast staple. Her technique employs a few suprisingly simple but crucial methods that elevate ordinary pancakes into cloud-like discs of breakfast perfection. The magic lies not just in the ingredients, which are pantry staples, but in her methodical approach to mixing, resting, and cooking the batter.
1. Ingredients & Substitutions
The Foundation
- 2 cups all-purpose flour
- 2 teaspoons baking powder
- 1 teaspoon baking soda
- 1/2 teaspoon salt
- 3 tablespoons granulated sugar
- 2 large eggs, room temperature
- 3 cups buttermilk
- 4 tablespoons unsalted butter, melted and cooled
- 1 teaspoon pure vanilla extract
- Vegetable oil or butter for cooking
Martha’s choice of ingredients isnt random. The combination of baking powder and baking soda creates the perfect chemical reaction with buttermilk, producing carbon dioxide bubbles that give these pancakes their signature height. The buttermilk itself contributes both tangy flavor and tenderness by breaking down the gluten strands that might otherwise make pancakes tough.
For those with dietary restrictions, the recipe adapts beautifully. Lactose-intolerant breakfast lovers can substitute regular milk mixed with a tablespoon of white vinegar or lemon juice for the buttermilk. Let it sit for 5 minutes before using to achive that same tangy profile and chemical reaction. Plant-based eaters can use flax eggs (1 tablespoon ground flaxseed mixed with 3 tablespoons water per egg) and plant-based milk with the acid addition.
The flour selection matters tremendously. Martha’s recipe calls for all-purpose flour, which provides the ideal protein content (around 10-12%) for pancakes. Too much protein (as in bread flour) would create a chewy rather than tender texture. Cake flour, while creating tender pancakes, sometimes lacks the structure to support the magnificent rise. For gluten-sensative folks, a 1:1 gluten-free flour blend with xanthan gum works remarkably well.
2. Step-by-Step Instructions
Mixing the Batter
- Whisk together your dry ingredients—flour, baking powder, baking soda, salt, and sugar—in a large bowl. This even distribution ensures consistent leavening throughout the batter.
- In a separate bowl, whisk the eggs until frothy, then add buttermilk, cooled melted butter, and vanilla extract. The temperature of your ingredients matters here; cold ingredients can cause the melted butter to resolidify into small clumps.
- Pour the wet ingredients into the dry ingredients and stir gently with a spatula or wooden spoon. Here’s where most home cooks go wrong—overmixing develops gluten and destroys those precious air bubbles. Martha insists you should mix just until combined, embracing the lumps in your batter.
This minimal mixing approach seems counterintuitive to many cooks who’ve been trained to create smooth batters. Trust Martha on this; those small flour pockets will cook out, and the uneven texture actually contributes to the pancakes’ fluffiness. If you see flour streaks, thats okay—just a few more gentle folds and you’re good to go.
The Crucial Rest
After mixing, Martha recommends something that separates amateur pancakes from professional ones: resting the batter. Let it sit for at least 10 minutes, though 30 minutes is ideal. During this time, the flour hydrates fully, and the leavening agents begin working their magic. The gluten relaxes, and the batter thickens slightly to the perfect consistency.
I’ve found this resting period to be non-negotiable for truly exceptional pancakes. In a pinch, 5 minutes is better than none, but the full rest delivers pancakes that rise higher and cook more evenly. The difference is visible in the first batch.
Cooking Technique
- Heat a heavy skillet or griddle over medium heat. Martha prefers cast iron for its heat retention, but a good non-stick pan works well too. The surface should be hot enough that water droplets dance and evaporate quickly, but not so hot that they immediately disappear.
- Lightly brush the surface with butter or oil. Too much fat will create crispy edges rather than the uniform golden surface we’re seeking. Martha’s tip: wipe excess fat away with a paper towel, leaving just a thin coating.
- Pour about 1/4 cup of batter per pancake, allowing space between each for spreading and easy flipping. The perfectionary moment to flip comes when bubbles form on the surface and the edges begin to set—about 2-3 minutes. Flip just once and cook the second side for 1-2 minutes until golden brown.
The timing of your flip is crucial. Flipping too early results in a messy, undercooked interior, while waiting too long can lead to overly dark exteriors. Watch for that moment when the bubbles on the surface begin to pop and leave small holes that don’t immediately fill with batter—that’s your signal.
3. Cooking Techniques & Science
Martha’s pancake excellence stems from understanding the science behind breakfast alchemy. The buttermilk’s acidity activates the baking soda, while also tenderizing the gluten in the flour. This creates a dual-action leavening system—chemical reactions starting in the bowl and intensifying in the hot pan.
The separate mixing of wet and dry ingredients ensures even distribution of leavening agents and prevents the premature activation of baking soda. Once combined, those bubbles begin forming, which is why immediate cooking isnt advised—you’d miss the full potential of the rise.
Temperature control stands as another critical factor. Too hot, and pancakes brown before cooking through. Too cool, and they become dense and pale as they slowly cook, loosing precious steam that would otherwise create internal pockets. Martha recommends maintaining a medium heat and adjusting as needed throughout the cooking process. Your first pancake often serves as the “test pancake” to calibrate your temperature.
The thickness of the batter directly effects your final product. Martha’s batter has a distinct consistency—it should pour slowly from the spoon, not run like water or sit in stiff peaks. If your batter seems too thick after resting, add a tablespoon or two of buttermilk. Too thin? A sprinkle of flour resolves the issue. This viscosity ensures the batter spreads appropriately on the griddle while maintaining enough structure to rise properly.
4. Serving & Pairing Suggestions
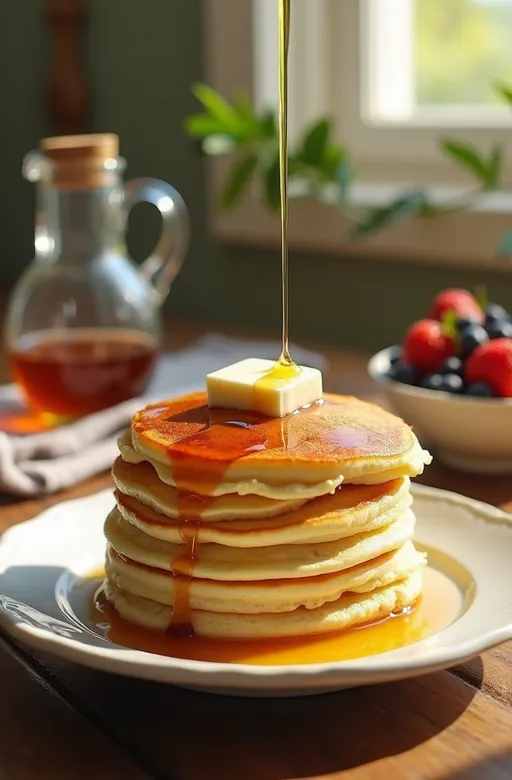
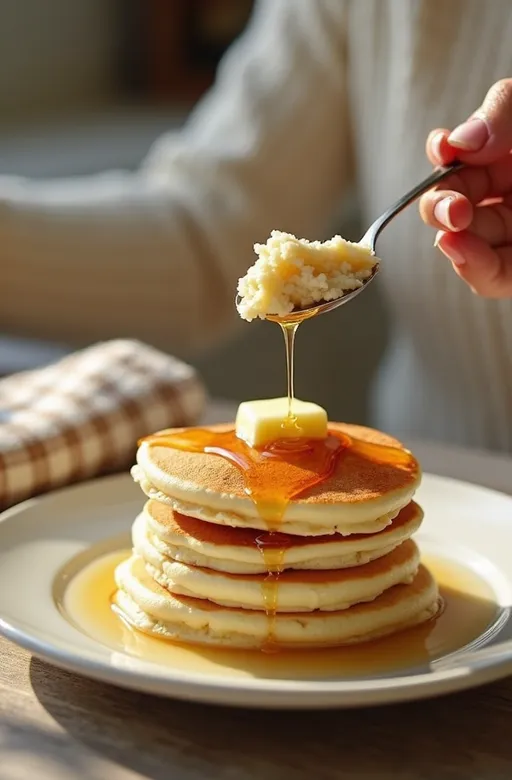
Martha’s pancakes deserve thoughtful presentation. Rather than drowning them immediately in syrup, she suggests placing them in a single layer on a wire rack in a 200°F oven to keep warm while preparing the full batch. This maintains their crisp edges while allowing for simultaneous serving.
For the classic approach, stack three pancakes, add a pat of cultured butter (higher butterfat content creates a more luxurious mouthfeel), and drizzle with warmed pure maple syrup. Martha specifically advocates for Grade A Dark Amber maple syrup for its robust flavor profile that stands up to the buttermilk tang.
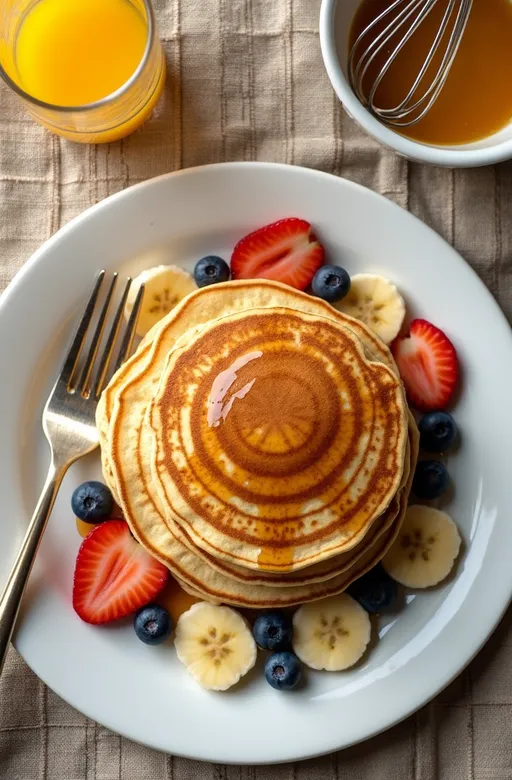
Beyond the traditional, these pancakes provide an exceptional canvas for creative variations. Fresh berries macerated with a touch of sugar and lemon zest offer a bright counterpoint. Caramelized bananas with a sprinkle of cinnamon elevate the experience into dessert territory. For a savory twist, reduce the sugar in the batter and serve with crisp bacon and a dollop of herb-infused crème fraîche.
Beverage pairings matter too. A bright, acidic coffee cuts through the richness, while fresh-squeezed orange juice offers palate-cleansing brightness. For weekend indulgence, a mimosa or Bloody Mary transforms the meal into a celebration.
5. Variations on the Classic
Martha’s base recipe lends itself to endless customization without compromising the essential fluffiness that makes these pancakes legendary. Here are some Martha-approved variations:
Blueberry Buttermilk Pancakes
Fold 1 cup of fresh blueberries (or frozen, unthawed) into the batter after it has rested. The key technique: rather than mixing berries directly into the entire batter, sprinkle them onto individual pancakes immediately after pouring the batter onto the griddle. This prevents the berries from sinking and creating soggy spots around them.
Lemon-Ricotta Pancakes
Add the zest of one lemon and 3/4 cup of whole milk ricotta to the wet ingredients. The ricotta introduces pockets of creaminess while the lemon brightens the entire profile. These pancakes cook slightly slower due to their moisture content—be patient and keep the heat moderate.
Whole Grain Variation
Replace half the all-purpose flour with whole wheat pastry flour (not regular whole wheat, which is too heavy). Add 1 tablespoon of honey to the wet ingredients to complement the nutty flavor of the whole grains. These require a slightly longer rest period—about 45 minutes—to fully hydrate the whole grain flour.
Spiced Apple Pancakes
Fold 1 cup of peeled, grated apple (squeezed of excess moisture) into the batter along with 1 teaspoon of cinnamon and 1/4 teaspoon of nutmeg. The natural sugars in the apple create gorgeous caramelization on the surface of each pancake. Serve with apple cider syrup for the ultimate fall breakfast experience.
6. Troubleshooting Common Issues
Even with Martha’s precise instructions, pancake problems occasionally arise. Here’s how to address the most common issues:
If your pancakes aren’t rising properly, check the freshness of your leavening agents. Baking powder and baking soda lose potency over time—they should be replaced every 6-12 months, regardless of expiration dates. Also verify your buttermilk is sufficiently acidic; older buttermilk actually works better than fresh in this recipe.
Dense, gummy centers typically indicate undercooking or overmixing. The tell-tale sign of readiness for flipping isn’t just bubbles, but bubbles that pop and leave holes. For the mixing issue, remember Martha’s mantra: “Lumps are your friends in pancake batter.”
Uneven browning often stems from hotspots in your pan or inconsistant batter thickness. Using a heavy-bottomed pan and allowing it to preheat thoroughly helps create even heat distribution. For consistent thickness, a 1/4-cup measure or ice cream scoop ensures uniform portions.
Conclusion
Martha Stewart’s pancake recipe transcends the ordinary through its perfect balance of science and sensory appeal. The combination of dual leavening, minimal mixing, and crucial resting time creates pancakes that rise magnificently while maintaining a tender crumb. The buttermilk provides both flavor complexity and functional benefits to the chemistry of the batter.
What truly separates this recipe from countless others is Martha’s attention to technique. The temperature control, proper flipping timing, and methodical approach elevate simple ingredients into something extraordinary. Its no wonder her pancakes have become the weekend ritual for countless families seeking that perfect breakfast experience.
Remember the key takeaways: embrace the lumps, give the batter time to rest, watch for the bubble-pop signal before flipping, and maintain moderate, consistent heat. Master these elements, and you’ll never again settle for flat, rubbery pancakes or rely on boxed mixes.
Martha Stewart’s pancake recipe doesn’t just produce exceptional food—it creates a morning ritual worth savoring, one golden, fluffy stack at a time.
FAQs
Can I make the batter the night before?
Yes, with slight modification. Prepare the batter but add only half the leavening agents. Refrigerate overnight in an airtight container. In the morning, gently stir in the remaining baking powder and baking soda, then let the batter sit at room temperature for 10 minutes before cooking. The overnight rest actually develops more complex flavor, though the pancakes might not rise quite as dramatically as fresh batter.
Why are my pancakes flat despite following the recipe exactly?
Check three things: First, your leavening agents may be expired—test baking powder by adding a pinch to hot water (it should bubble vigorously). Second, verify you’re not overmixing, which deflates crucial air bubbles. Finally, ensure your skillet isn’t too hot, which causes the outside to set before the inside can rise properly.
Can I freeze leftover pancakes?
Absolutely! Cool completely, then place parchment paper between each pancake before wrapping tightly in plastic and placing in a freezer bag. They’ll keep for up to 2 months. Reheat in a toaster or 350°F oven until warmed through—never microwave, which makes them soggy.
What’s the secret to getting that perfect golden color every time?
Martha’s technique involves two factors: First, wiping excess fat from the pan between batches prevents uneven browning. Second, maintaining consistent medium heat throughout the cooking process—if your pancakes are browning too quickly, don’t hesitate to lower the heat slightly. The perfect temperature produces pancakes that cook through at exactly the same rate they achieve golden perfection on the outside.
How thick should the batter be, and how can I adjust it?
The ideal consistency resembles thick heavy cream—it should pour slowly but spread gradually on the pan. If too thick (pancakes remain domed rather than spreading slightly), add buttermilk one tablespoon at a time. If too thin (pancakes spread too much and are flat), add flour one tablespoon at a time. Always make these adjustments after the resting period, as the batter naturally thickens while resting.

Veronica is a passionate food enthusiast with over three years of experience in exploring and writing about diverse cuisines. Her expertise lies in reviewing restaurants, sharing creative recipes, and discovering the latest food trends. As the voice behind FoodieRecap.com, Anju brings fresh perspectives and culinary insights to her audience.
